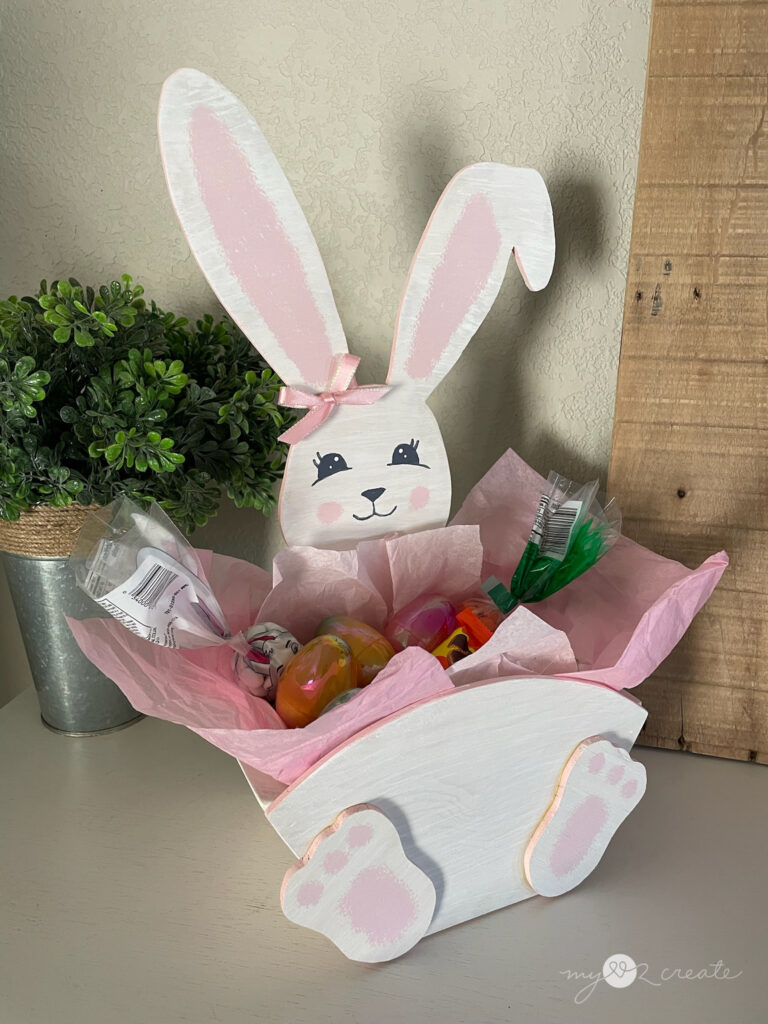
Bunny Crate
Sometimes scrap wood is the BEST! Why you ask? Well, because I just built the cutest EVER Bunny Crate for free, from my scrap pile! Sa-weet!
Check this out…
I mean come on…
We are up-ing the cute crate factor on this one! I would have LOVED an Easter basket like this as a kid.
Let’s get started and I will show you how to make this adorable Bunny Crate, just in case you want one too, whether you are a kid or not. Are you with me?!
How to make a Bunny Crate
Get your Bunny Crate Plans/Template Here!
This post contains affiliate links, read more.
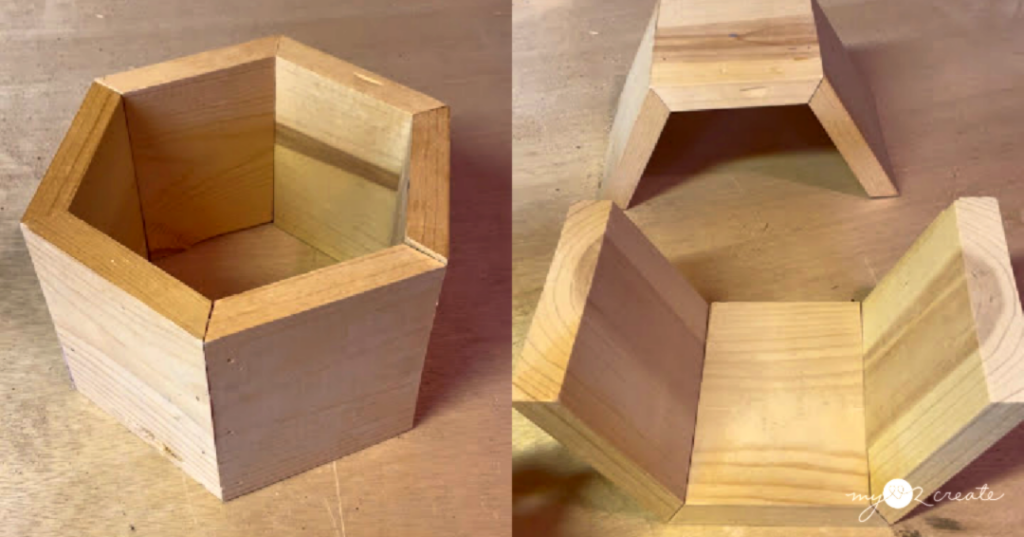
These two hexagon half wood pieces were in my scrap pile…a project I must have started years ago. While I was looking at them, inspiration struck. Since they were in two halves I noticed that one half looked like a little basket or crate itself…and since I was wanting to do an Easter project…I suddenly KNEW what had to happen! This is the magic of creating with what you have…random things can spark ideas you never even thought of…I love it!
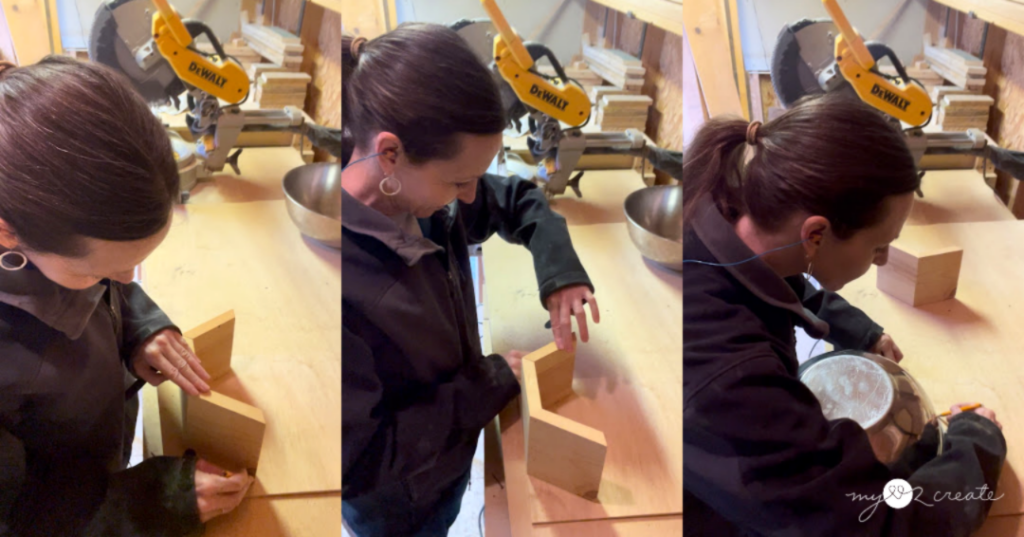
Step 1: Create your crate base
You are going to start with a base using half of a hexagon shape. Basically it is three pieces of 1×6 wood cut at an angle of 30 degrees on your miter saw. Glue and nail the pieces together with wood glue and 1 1/4” finish nails.
I have several projects I have made with Hexagons, to help with building this part you can check out my; Hexagon and Triangle Shelves, Long Hexagon Tray, Triangle Hexagon Tray, DIY Hexagon Planters, DIY Porch Planters, and for fun if you love Hexagons…check out my Hanging Hexagon planter. Wow. I love hexagons, ha ha!
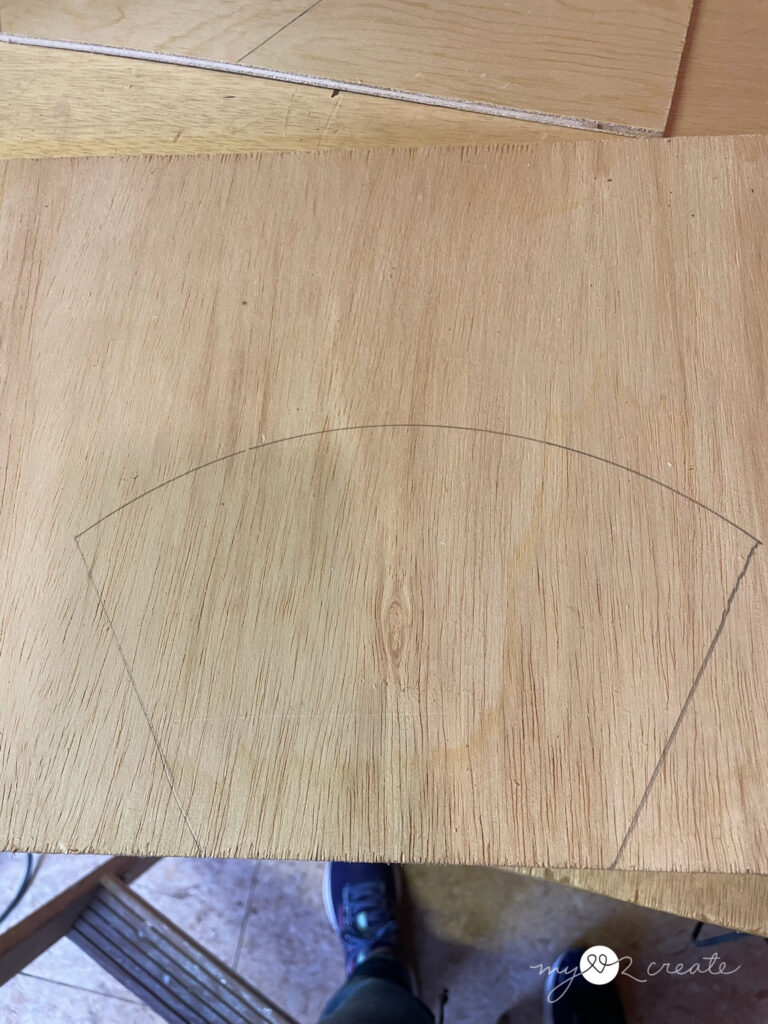
Step 2: Trace and draw your front and back pieces and feet onto plywood
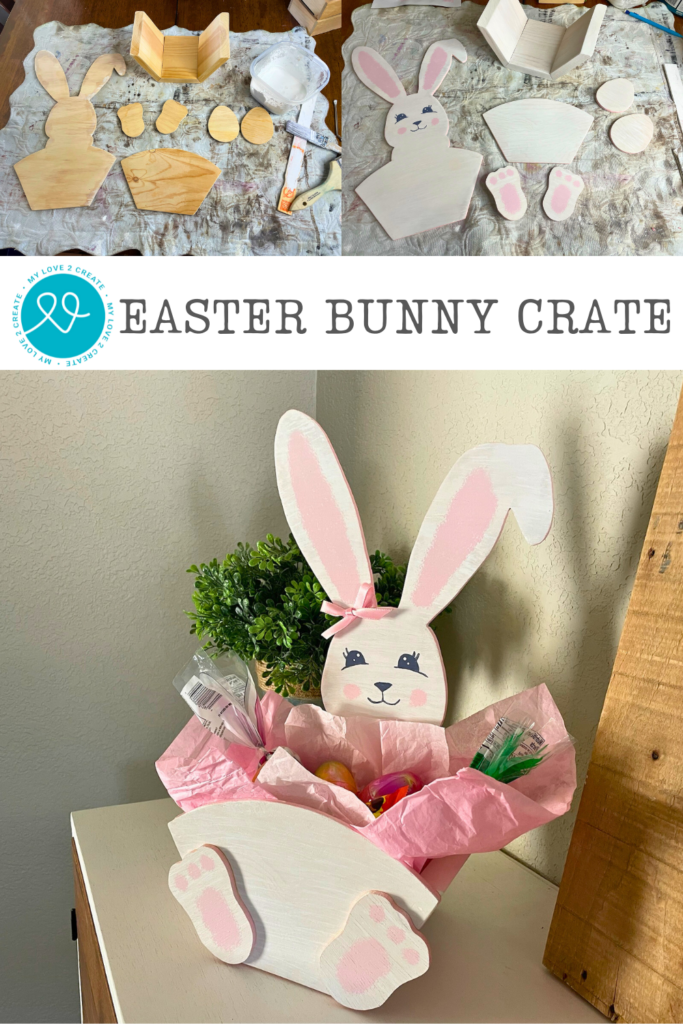
Once you have built your base, take some 1 1/4” thick plywood, (I used scraps that I had in my pile) and trace the outline shape of the crate/half hexagon onto the front of the plywood. Make sure to save space by putting the bottom edge of the crate base flush with the bottom of the plywood, so you just have to trace the sides. Next, to make a round shape for the top, or you could cut it straight if you desire, use a large bowl or circular object to connect the top section. The front section should look like this…
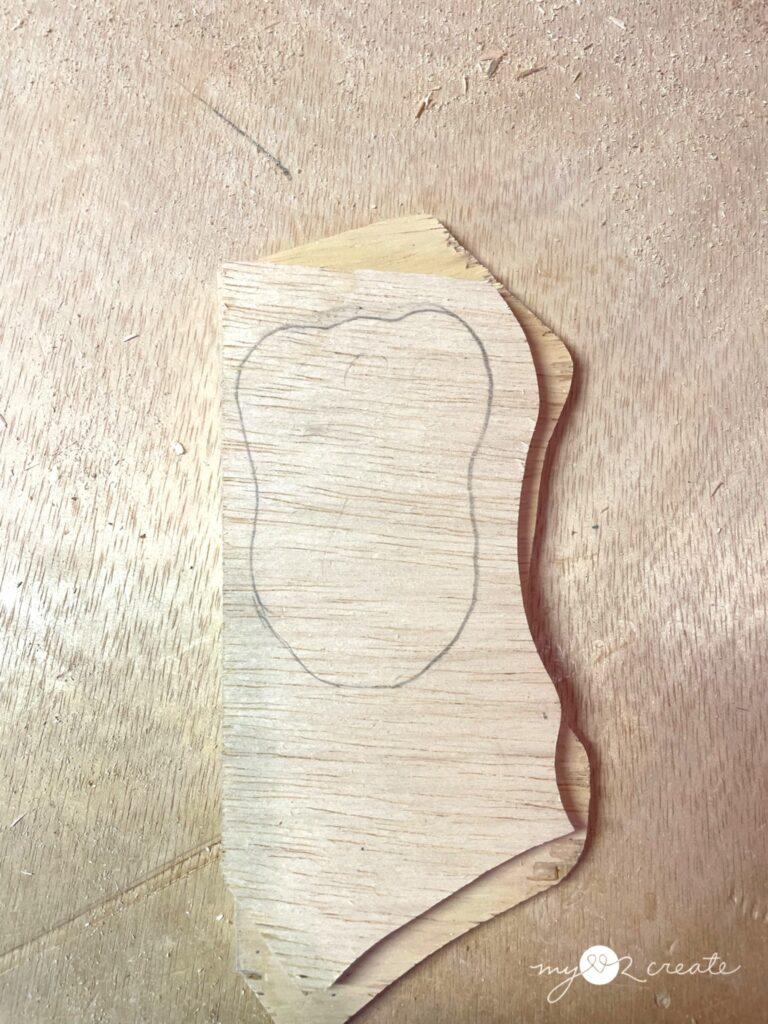
For the back of the crate do the same thing but create your bunny shape in the middle of the rounded section. Or if you want to get creative…do any shape you desire! Or do it the same as the front and make a very simple crate…this is the best part of DIY you can make it anyway you want!

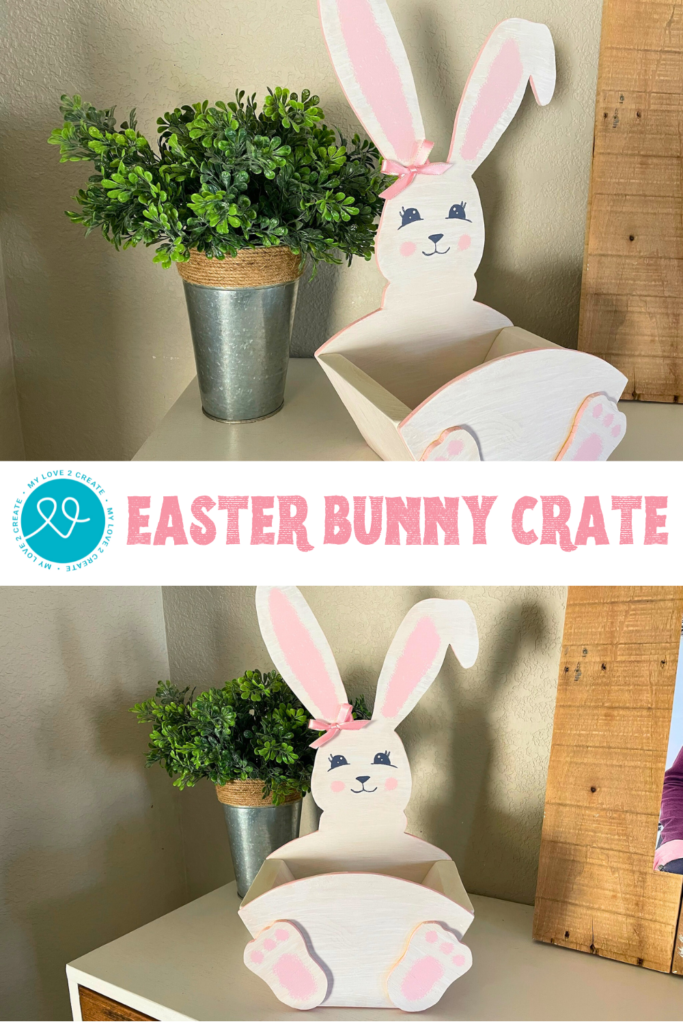
This is my attempt at being an artist…ha ha! Obviously, I am NOT and artist…I was struggling with that bent ear…and maybe with getting the bunny centered…but hey I have learned that perfect isn’t important. 🙂
Of course we can’t forget the bunny feet! I mean…they are a pretty important part of the cuteness. I used the scrap wood from the sides of when I cut out the back piece to cut my feet.
I actually cut some egg shapes to make wooden tags for the crate, but I didn’t end up finishing them for this post. But lucky for you if you get the plans for this, my template includes the egg shapes if you want to cut them out. You will see them throughout this post.
Step 3: Cut out your plywood pieces
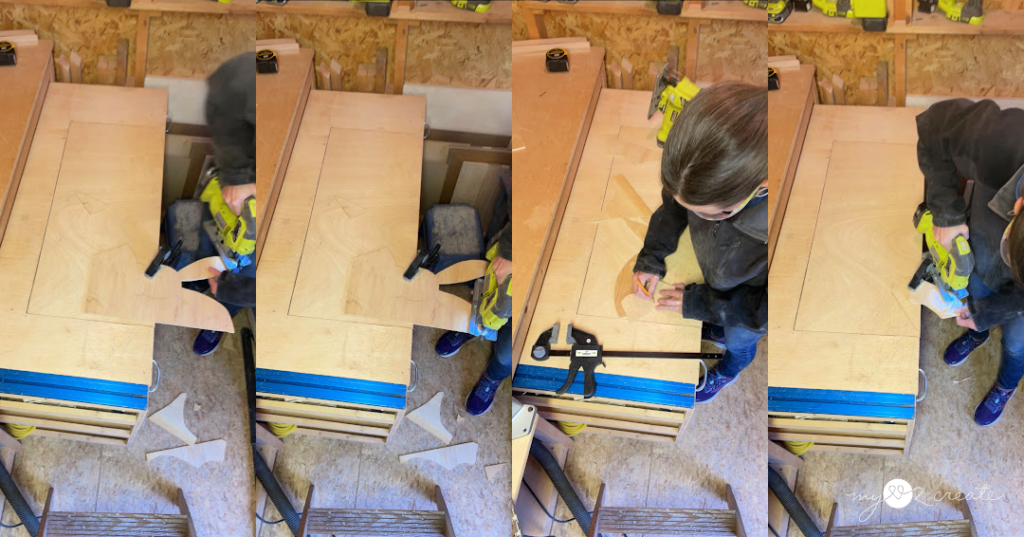
I used my Ryobi Jig Saw to cut out my plywood pieces for this crate, but you could use a scroll saw as well. You will need to cut the front piece, back piece, and both feet. I used a bar clamp to secure my pieces as I cut. When I cut the feet I cut them both at the same time, work smarter!
Step 4: Sand Pieces and Paint or Stain
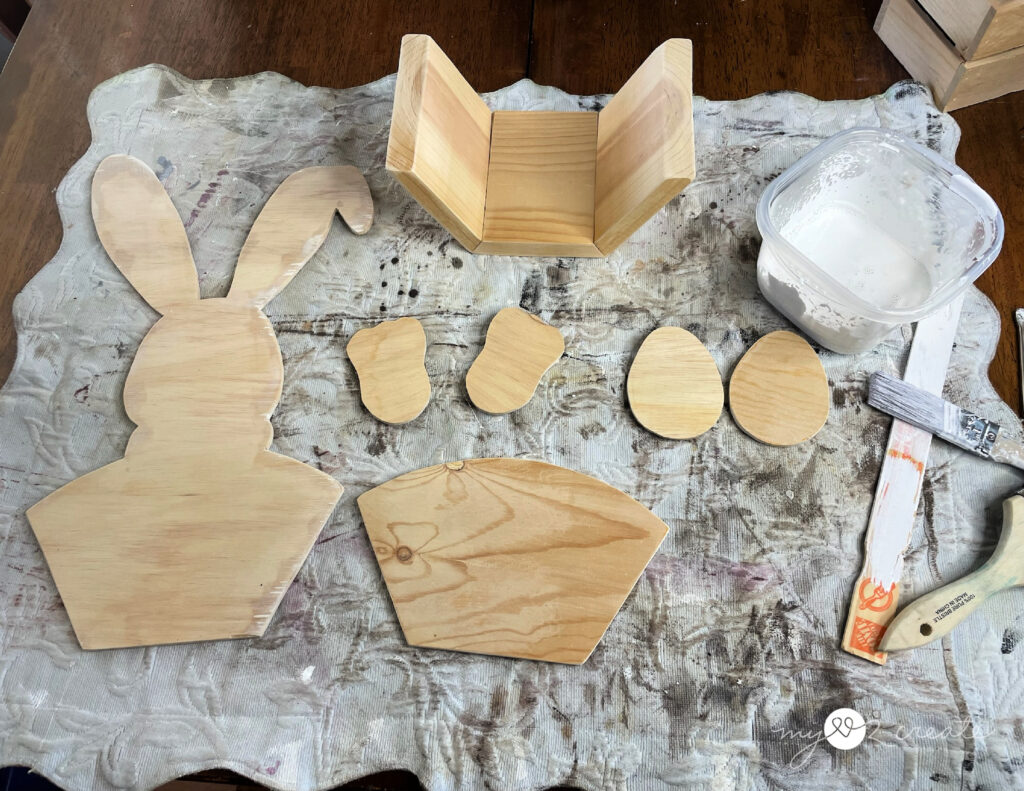
Once I had all my pieces cut I filled in any gaps with wood filler or spackle works if you are painting. Then sand them a hand sander or sand paper to remove any rough edges. Here are all my pieces laid out ready to paint! You can see the two egg pieces…I may still may make tags out of them.
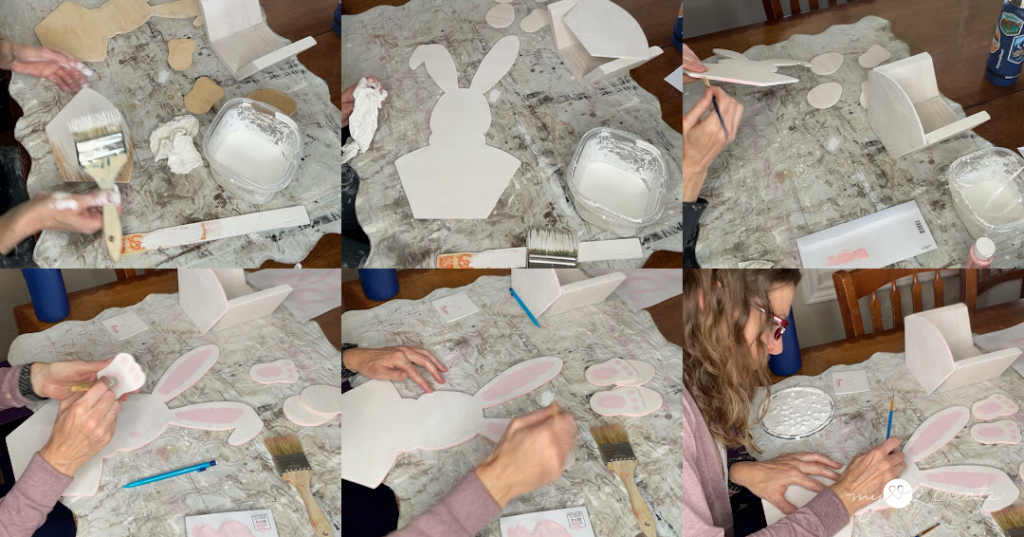
I decided to do a white wash on my bunny. You just water down white paint, then paint it on and wipe it off. If you want it less transparent then do more coats…super easy! For the pink ears and paws and cheeks I used a stencil brush to dab on the pink paint. I like this method because it doesn’t have to be perfect. For the face I did draw that on with a pencil and then used a blue gray paint to draw it on…not as easy! (unless you are an artist…which we already covered, that I am not) However, despite not being an artist I think anyone can do this…I finished off the dark parts of the eyes with a couple small dots of white paint using the back of the round brush (bottom right photo above).
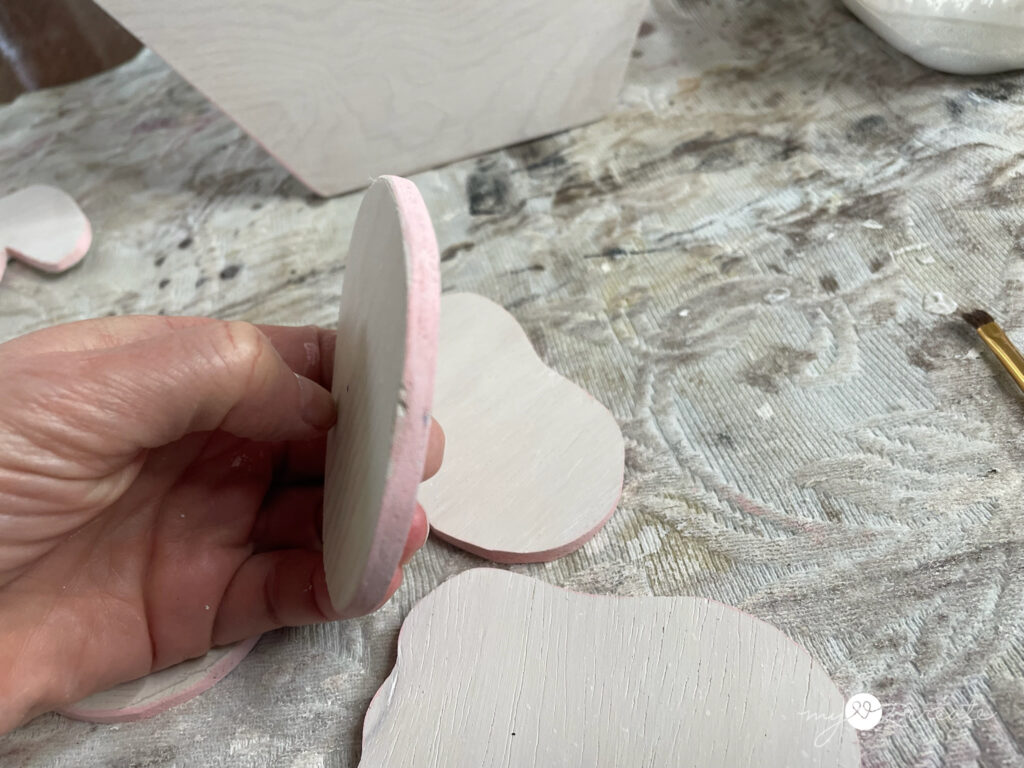
For a fun touch of color, I used a wash of pink paint and some water to paint all the edges of the plywood.
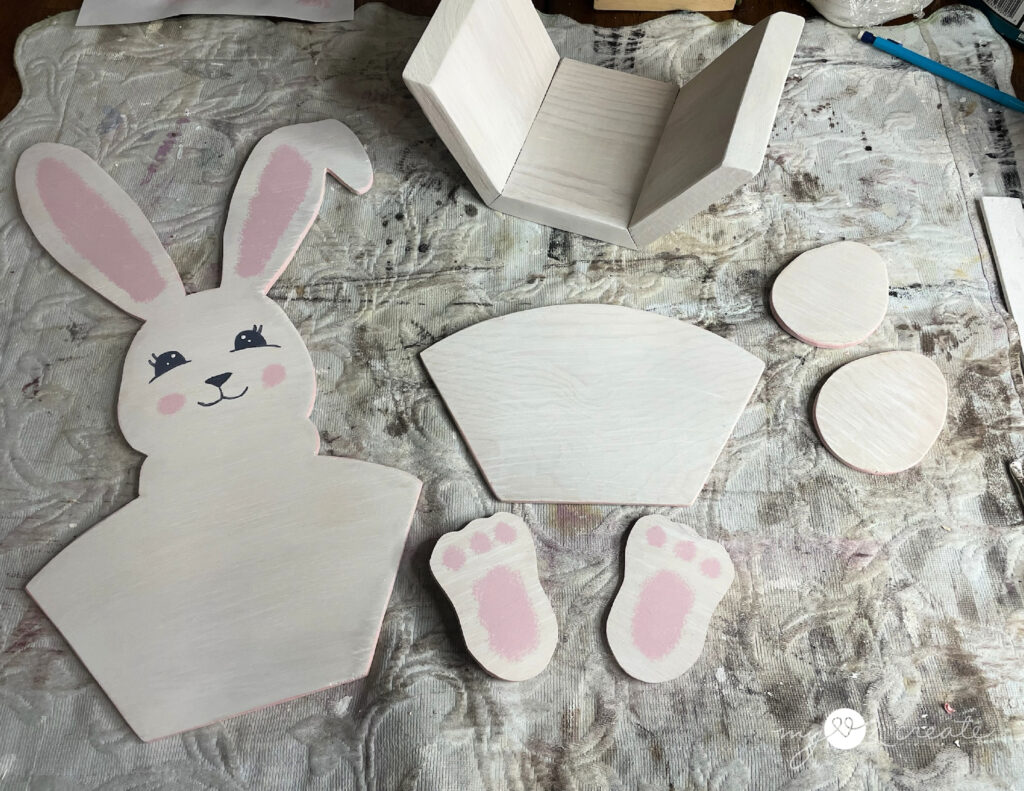
And with that, this bunny I ready to be built!! I toyed with the idea of doing a brown bunny with stain and maybe some paint. I do still have the other half of the hexagon in my shed…maybe a this cute bunny needs a friend!
Step 5: Build your Crate
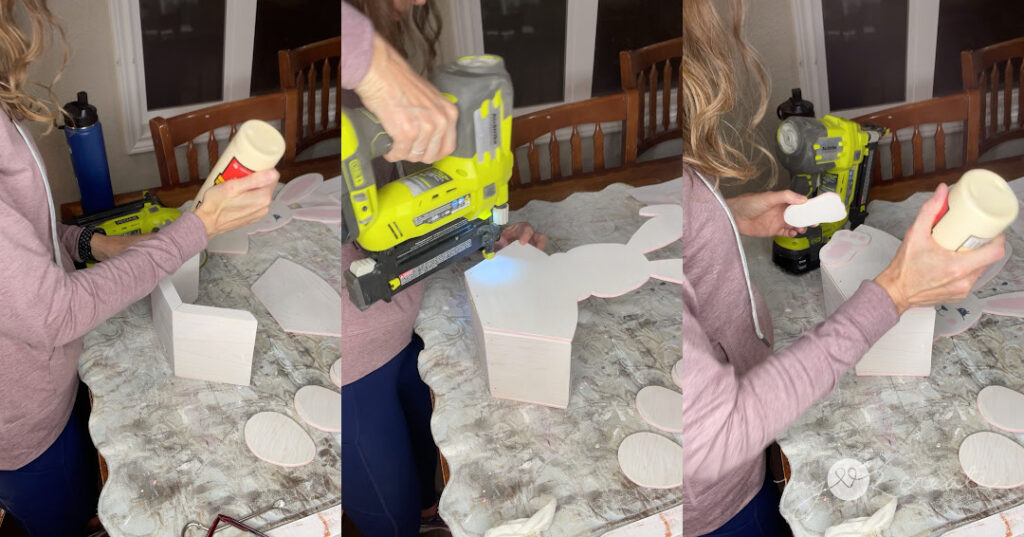
Once you have your bunny crate painted or stained how you desire, then it is time to build! I love this part when it all comes together. I started by applying my wood glue to the half hexagon crate piece then I used my Ryobi nail gun to nail on the front piece, using 5/8” finish nails. Then I did the same with the back (make sure your bunny is facing the right direction first!). For the feet, I just applied wood glue and let it dry. I did fill my nail holes with white spackle so they wouldn’t be noticeable, that is optional.
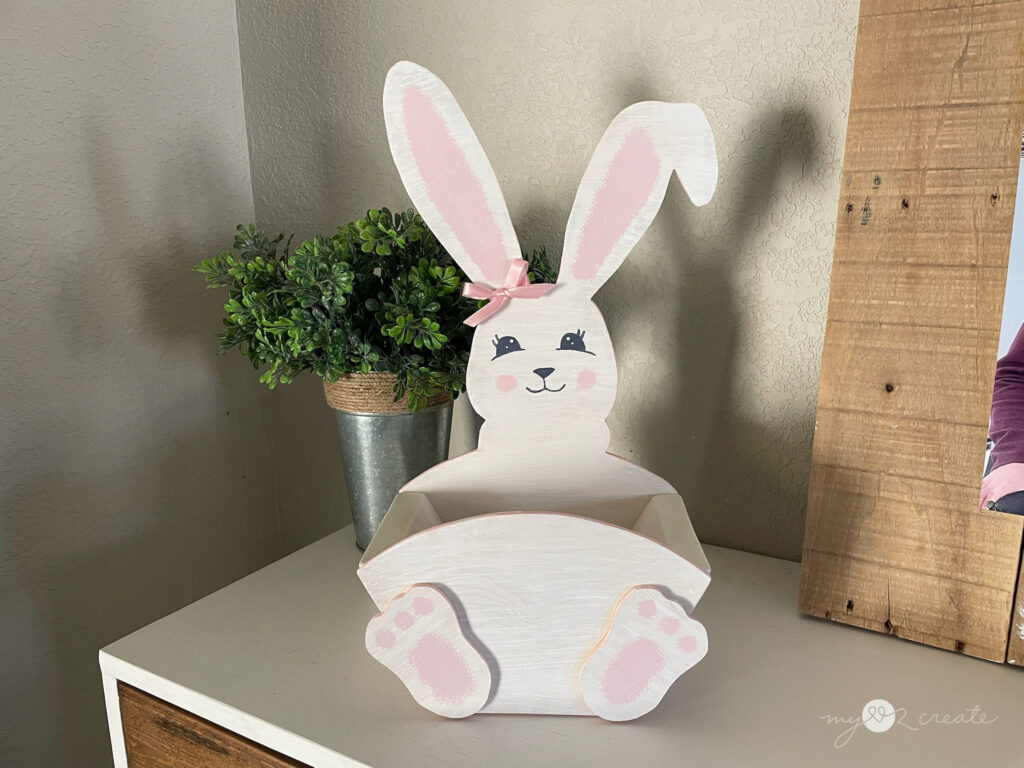
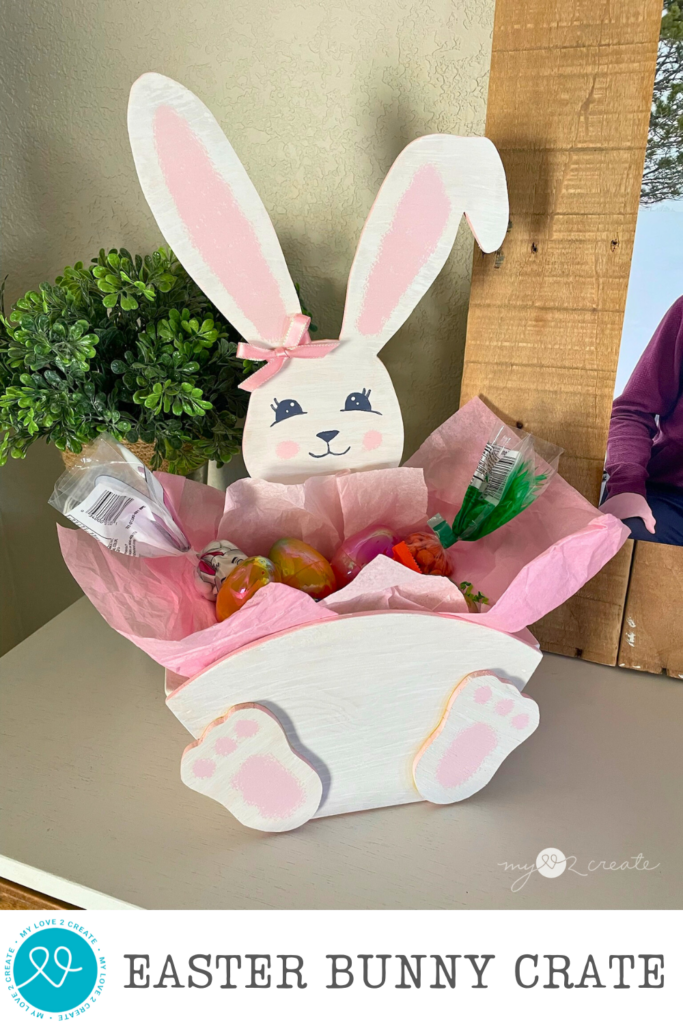
And that’s a wrap folks!! This Bunny is ready to spread some Easter Cheer! I thought a cute ribbon bow to adorn the ear would be a nice touch, obviously this is optional as well.

I think this would be a cute Easter decoration if you wanted to add some tissue paper and some easter candy, or just fill it with easter eggs for decor!
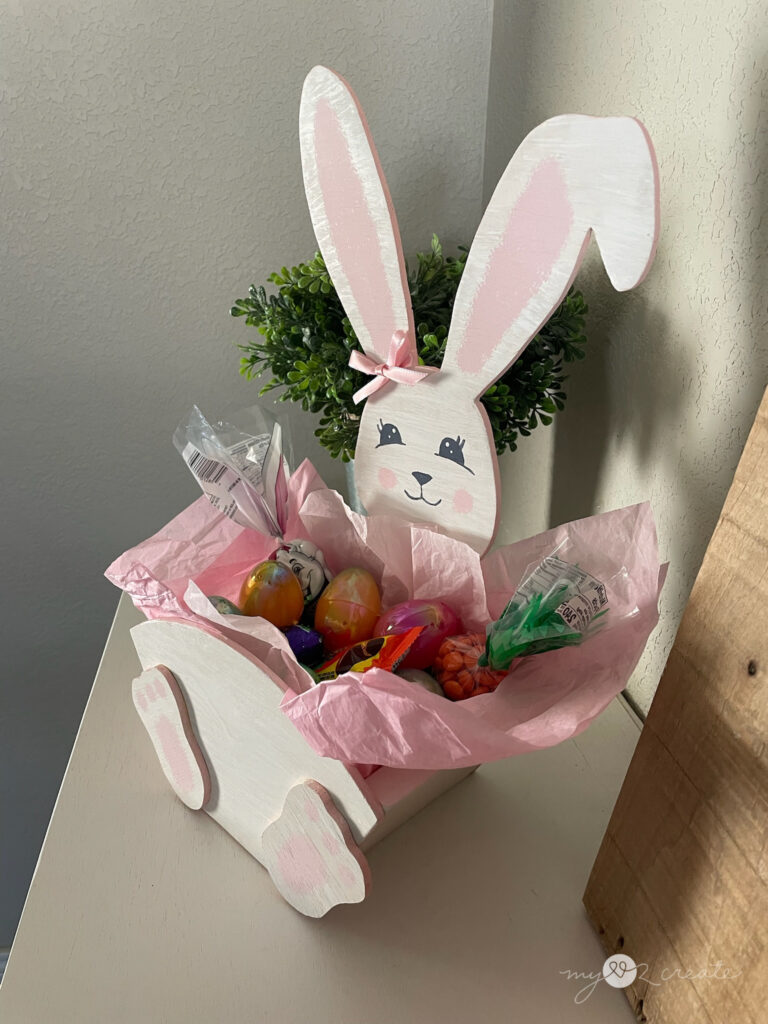
Using it as an easter basket is even more fun though! I like to keep my Easter baskets small and simple so this is a great size for that. If you want to go bigger then that is easy, make it with a 1×8 board instead and you have a bigger basket!

Look how happy this bunny face is to hold Easter candy! It reminds me of the days when I was a little girl and took a tole painting class with my mom…good times.
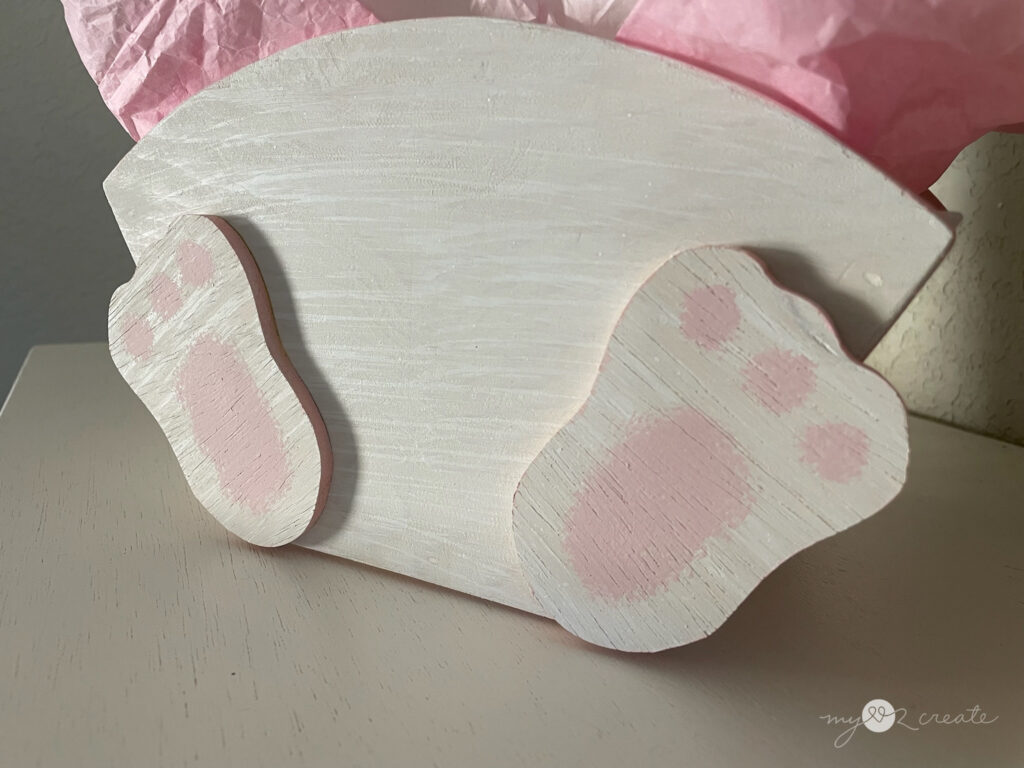
The little feet are a fun touch on this, and trust me SO easy to paint if you just pounce the paint on with a stencil brush…I was dreading painting on perfect circles when I notice my stencil brush and knew that would cover up my lack of painting skills! I do want to note that after I painted on the white I used a chip brush lightly dipped in white paint and ran it lightly across the pieces to add texture.
I am loving this cute little bunny crate, and I hope it inspires you to make one or more for your kids or grandkids, or even for yourself!!
Make sure to pin it for later!
Or better yet, pin and share it with your friends, make it a Bunny Crate making party! I always love creating with friends, especially because people make things with their own flare and that makes it more interesting!
I hope you enjoyed this project, thanks for visiting!