Desk and Hutch Makeover
I am so happy to be posting this! It was a lot of work for me, and took a lot of time….but I finally finished my husband’s desk and hutch!

I love it!! And the best part…so does my husband, phew!

So do you remember this picture from my Reclaimed Wood Table post?
I got some good advice from several of you and I am so Thankful!! I appreciate your opinions! I decided to go with what Cristina at Remodelando La Casa suggested and add bead board and dark stain. She is pretty amazing and it shows in all she does, I love her blog!
Anyway…this is what I did.

I sanded my brains out! Yep, that is me, I decided that at some point you need to see me doing the work, so I had my son snap a shot. Awesome.
I was planning on using a stripper, but it was all gone. And since I have no money to by more, I was forced to do hard labor. I stained the tops of both the desk and the hutch in Rustoleum Dark Walnut.

They sat like this for several days. When my husband was gone teaching one evening the kids played in the yard and I set to work… (I was surprising him with the new finish for our 15 year anniversary!)

First up I unscrewed the backing on the hutch, and saved the screws. Then I put the backing onto some bead board and traced the shape of the backing on (minus the hole in the middle). I cut the bead board with a jigsaw.

Then I placed the old backing on top of the new bead board backing and used a pencil to mark where the screw holes should go. (top left picture)
In the middle you can see how I broke the side of the hutch when I first removed the old backing. I was okay with this because I knew I could fix it. First I put the new bead board backing into place, and then I glued it back together using painters tape and clamps. Good as new! Oh, and I also screwed the new bead board backing on.

Next up was to add bead board to the back of the desk. Why? Well it is going to be facing out, so I wanted it to look more finished and match the hutch. I glued and nailed on two panels, I had to use two because there was a wood divider that I couldn’t remove.
And do you notice how dirty the bead board is? (don’t worry I did clean it before I painted) I got it free off the side of the road at our city spring clean up! Yippee!

Then I prepared to paint by covering the stained tops. But first notice in the top right photo, I added some base trim to finish off the look. I just put it on the sides and the back of the desk. It made a HUGE difference.
I went to use a grey paint I had on the shelf and when I opened the can it was ruined. Ugh! So I mixed up some of the paint I had to make a greyish color.
Once painted, I lightly distressed it and then followed up with three coats of poly, sanding with 400 grit sandpaper between coats.

The desk needed new handles. I have been saving these silver ones from the Restore (6 handles for $1.50). I spray painted them in oil rubbed bronze along with the key hole and the cord hole cover for the top of the desk.

I was done! (ok, after I drilled new holes for the handles and put the hardware back on)
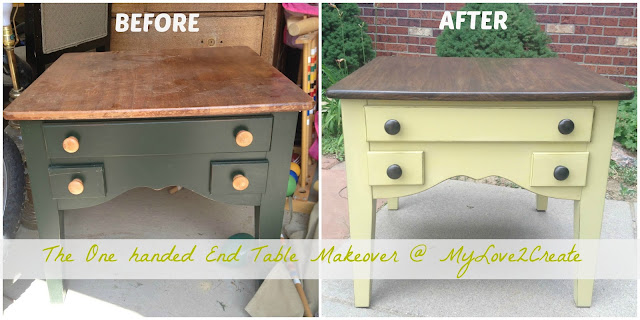
It went from this…

To this! Ahhh, much better. Now to see how they look after a little styling…

Not a bad makeover for a grand total of $21.50! (desk and hutch $20, handles $1.50, reclaimed wood table I made for free)
See how the back of the desk needed to be prettied up? The bead board and trim really add that finishing touch (Thanks Cristina!).

Here are a few close ups, and please ignore the bad picture quality, but until I have a nice camera….

…I am making due with what I have.

At some point I plan on doing the whole room, adding some pops of color and putting something on the walls.

You clever lady! I wish I had the patience to do this type of thing. I used to many years ago but i'd bodge it and it would fall apart within weeks. Fabulous job! You're awesome!
Leanne x
http://www.oh-mydze.blogspot.com
Very lovely! The beadboard and trim look they were meant to be there all along!
I love it! The stained tops turned out beautifully! Nice and even. Your hubby is a lucky man!
What a transformation! Love it!!
Happy 4th to you as well friend! I can not believe my eyes! That piece looks like a totally custom piece! The handles and the beadboard give it such charm!!! And the color you went with on the top of the piece as well as the overall color is perfect!!! What an amazing job! The before and after is just insane!!!
Lovely transformation! I especially like the beadboard. Thanks so much for linking up to The Creative Connection!
Mindi, this looks awesome!! You did a great job! I love the color you painted it and the handles!!
Selene @ Restoration Beauty
Found you on Catch as Catch Can – LOVE this and especially the bead board detail. Very nice job!
You did a great job! I love the after! Just stopping by to let you know you've been featured on my Finding Friday Favorite Finds. Be sure to swing by and grab my featured button; you deserve it!
http://itsalwaysruetten.blogspot.com/2013/07/finding-friday-my-favorite-finds.html
I hope you will link up to my What I've Been Up to… mid-year highlight party on Wednesdays in July!
Cheers,
Julia
It's Always Ruetten
Wow!!! What a fantastic transformation! I love the beadboard and trim. Those handles are gorgeous. I can't believe how nice it turned out. This is going to make me look at honey colored desks/furniture in a new light. Thanks for sharing with us. I've pinned it!
Bethany the ngnrdgrl
Oh mygoodness, Mindi! You blew my socks off with this transformation! Yes, I thought beadboard would work but I didn't picture all the magic you were going to work on these pieces, I love them!
What a gorgeous transformation! You can tell so much time and care went into this, and it turned out so great. I popped over from Alderberry Hill–thanks for sharing!
~Abby =)
This looks so great, Mindi! So classic looking! Sharing on Facebook later today!
Jenna @ Rain on a Tin Roof
I love all things beadboard and think you did an amazing job! I would love to have you share it here at our weekly link party http://www.theprincessandhercowboys.com/2013/07/on-display-monday-9.html
Have a good one!
My goodness! You keep yourself busy don't you? Great job looking forward to more inspiration.
Looks awesome! I love the colors and the trim really does make it look so much nicer.
Angela
Angela Says: Deep Clean a Laptop
Great Job! You made great choices on hardware and paint, I love it! Visiting from Craftomaniac!
wOw! You did an awesome job!! Thanks so much for sharen your talents with us at One Sharendipity Place this weekend!! Looking forward to seeing more!
sue @ Thet2women.com
Mindi, you did it again! WOWZA! You are definitely an inspiration and the queen of free! lol I want to find free beadboard and wood. lol Your hard work paid off. Everything looks amazing! Beautiful after photos and office!
Hi Mindi,This is an total 180* transformation! I love how it turned out! & the color choices. Thanks for your visit btw. I hope you entered the giveaway & stay tuned I have another coming up feel free to enter. Hope your having a great week! xo Theresa
What a great project! I love how it turned out. You made me run into the other room and look at a similar piece to see if I could do something like that on it…Alas, the top is laminate. daminate! 😛 Visiting from Green Willow Pond.
-andi
So beautiful! I just love it! I love the dark stain with the paint! Thank you for sharing at Give Me The Goods!
Dimples & Pig Tales
fabulously beautiful Mindi! love the updates–the color, the beadboard, and handles!!! $1.50? lucky girl!
catching you!
gail
Your Desk and Hutch turned out beautiful! I always love a stained top! I would love for you to come link up to my Paint Party going on now http://startathome.blogspot.com/2013/07/paint-party.html
Hope to see you there
Brooke
Start @ Home
I think you did a wonderful job! The addition of the beadboard was a great idea, really dressed it up. Take care – Dawn
Amazing Transformation!! Thanks for linking it up to Think Tank Thursday. I have featured you today!!
http://www.saving4six.com/2013/07/welcome-to-think-tank-thursday-38.html
I. Love. It. We have an oak desk I would love to finish like this! This one will definitely be in my Top Ten! Thank you for sharing it at What We Accomplished Wednesdays. Have a great week!
Hugs,
Deborah
What an awesome transformation! I'm featuring it in this PoPP Spotlight.
Wow! Your post caught my eye because I'm planning a desk and hutch re-do for my girls' room. I'm blown away by your transformation. Great job!! I would never have thought to add the bead board. Definitely going to try that!! Now if I can get over my fear of my jigsaw… 😉
Wow…those pieces turned out great! I am sure hubby was glad to get the finished project!
What a great project! You did a great job!
Love the after pictures. The desk/hutch look so much more modern instead of dated. I've been browsing around you blog and just loving it. I love the inspirational Sunday posts too. So simple and short yet very powerful. Thanks for sharing.
This makeover turned out wonderful! I can't believe you did this for around $20! I love how the beadboard makes it look much more upscale. I'm stopping by from Throwback Thursday (#3 Budget Bathroom Makeover and 4 Pumpkin Crock Pot Oatmeal)
It turned out absolutely amazingly Mindi- and I love how you flipped it around too to pair the different pieces together. Either way, you took something super dated and gave it a high end brand new look. You are quite the talent, friend! Thanks for sharing it at the Get Your DIY On Challenge this week:)