DIY Wood and Acrylic Floating Picture Frame
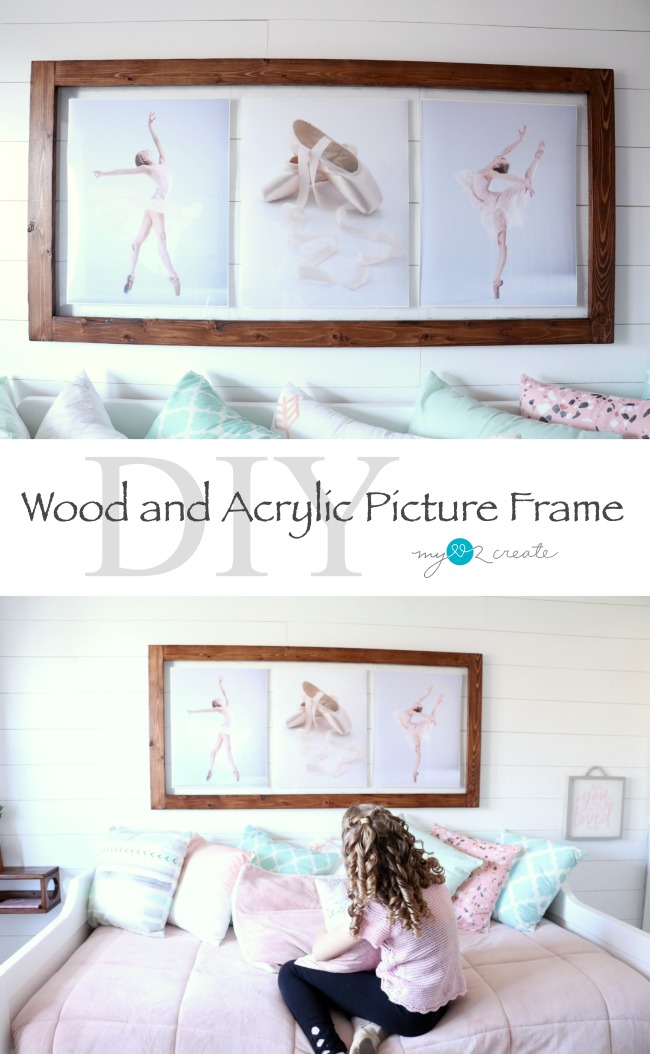
Hi my friends! I am thrilled to show you how to make your own DIY Wood and Acrylic Floating Picture Frame!
This is an easy project and one that will look amazing on your wall! I designed this frame for my daughter’s bedroom and it was the perfect solution to fill a large wall, plus add a little magic…
She wanted “fairy lights” and they have been a big hit in this frame, a very fun feature!
Let’s get started, shall we?
How to make a Wood and Acrylic Floating Picture Frame
SUPPLIES: *This post contains affiliate links: read more.
- 2- 1” x 3” x 8′ boards
- 2- 1″ x 2″x 8′ boards
- 3 Sheets of 18” x 24” x .093” Acrylic I purchased mine at Home Depot (you could use picture frame glass)
- Hot glue and glue gun
- Clear scotch tape
- 3 photos of your choice printed at 16” x 20″
- Miter Saw
- Wood glue
- Drill and Driver
- Nail gun
- Kreg Jig
- Fairy Lights with Remote (optional)
- Jig saw (optional if using lights)
CUT LIST:
- 2- 1×2’s @ 54 1/4″
- 2- 1×2’s @ 27 1/8”
- 2- 1×3’s @ 52 1/8”
- 2- 1×3’s @ 27 1/8”
Step 1: Cut Wood to size and drill pocket holes.
Cut all your wood pieces to size with your miter saw, then drill pocket holes into the sides of the long pieces of the 1×3’s. I also recommend sanding your wood once all pieces are cut.
Step 2: Build the picture frame.
Start by building your 1×3 front frame. Clamp the pieces and attach with wood glue and 1 1/4” pocket hole screws.
** Note if you choose to add lights to your frame take time to notch into your 1×2 bottom piece for the light battery kit, I used a jig saw to cut out a section that fit my light kit.
Then nail on the back 1×2 frame with wood glue and 1 1/4” nails flush to the outside edge of the 1×3 frame.
Step 3: Stain or Paint your frame.
I used my Vara thane Satin + Poly in Dark Walnut to stain my picture frame. You can also see I was staining my daughter’s floating shelf/nightstand at the same time.
Step 4: Attach the Acrylic to the frame.
To attach the acrylic to the frame I grabbed some scrap 3/4” thick boards to set in the middle of the frame, they helped to support the acrylic in the middle while I glued it in place. I peeled off the protective covering on both sides of the acrylic and then used hot glue to secure all three sheets to the inside of the frame. They should fit pretty perfectly in the frame, just make sure the ends are snug together when you add them. There will be a slight seam where they connect, but it will hardly be noticeable once your photos are added.
Step 5: Add your photos to the Acrylic.
If you use the 16” x 20” photos then you should have about an inch of space on all sides of each photo. I measured an inch on all sides and then secured the photos from the back to the acrylic with clear scotch tape, you don’t need a ton of tape, but make sure the photos lay flat. The tape is not even noticeable unless you are looking for it. 😉
Step 6: Attach the Fairy Lights to the inside of the picture frame.
I used some gorilla duct tape to attach my light battery pack into the notched out portion of my 1×2 back frame, and then used the clear scotch tape to attach the lights to the inside of the frame as well. You can see I bent the light wire so that only the mini light bulbs were peeking out of the edge of the frame.
Step 7: Hang and Enjoy!
I used three nails into studs to hang the frame, with the inside of the frame design it rests easily and securely on the nails, sitting flush against the wall.
I love how the pictures look like they are floating in the frame! The clear acrylic provides this illusion and protects the photos as well.
This frame is very light but large, it is a perfect focal piece for any room! You could add family photos or even do a collage of smaller photos if you would like!
With the Remote controlled lights my daughter can turn them off and on anytime with ease. What I love is that you don’t even know the lights are in the frame until they are turned on because they are so small.
She pretty much loves it.
And so do I! This project was done in less than a day, so basically…I think you should make your own, why not give it a try?!
It was fun to work with the acrylic and wood, I love adding different elements to my designs. I am sharing this project along with some of my other blogging friends who are combining wood with another medium.
Click on the links below to see what other materials they used with wood in their projects as part of the mixed medium challenge!
Thanks for stopping by!




I love that you can't see the lights until they're on… I am totally going to have to repeat that for a Christmas/NYE project! I also love the pics at the end. You can tell she loves it!
Mindi, your daughter's whole room is beautiful and this wood and acrylic frame creates the perfect art work to finish it off! LOVE that it even lights up! Mom of the Year for sure!
oh, Mindi! I love everything about this sweet frame, especially the lights. That was a pleasant surprise.
so, so pretty!
pinning!
gail
Mindi, This is beautiful. I loved being there in that lovely room. It is even more beautiful in person! I am so proud of you! You are amazing.
Mindi! This is so beautiful, and even more so in person! Her whole bedroom is a lovely place. I am so very proud of you! You are amazing!